Friday, December 16, 2011

Ruffled Christmas Tree cake


 Oh Christmas Tree!

Oh, I used that intro last time.
My bad.

Wanna see how to make this ridiculously raucous ruffled rarity?


Let me show you my inspiration. I saw this photo of a shirt on Pinterest and it screamed cake to me. (Sorry I do not know the owner of this photo.)
"MAKE ME INTO A CAKE!"


Ok, stop yelling at me. I will!


I wanted to make it a little bit more fun by coloring the batter. How did I do it you ask? Just make two batches of batter and color them with your gel or paste colors. Then just plop blobs of the batter into the pan alternately and randomly. Do not spread it out with a spatula, nor stir or swirl it. That will make the colors mix and give you black cake. Ask me how I know. :) .... Bake as usual.


Then I carved a basic triangular tree shape from the cake and used a leftover piece for the trunk. I decided after the first cuts that the tree was too thin, so I added small strips on each side to make it fatter. You can see the icing seems where I glued those pieces together.


Crumb coated.


Covered in fondant. You can surely use buttercream if you like.


Now it is time to make the ruffles. Cut a long strip of fondant.


 Use white fondant to cut circles for your polka dots.


Attach the fondant to the cake. Just pinch and  press the top edge of the fondant ruffle as you go along the width of the cake. Use shortening as your glue and you will love me forever. Trust me on this. No mess. No drippies. No smears. No cuss words. :)

I put the polka dots on after the green ruffle was on the cake. It was much easier to do it that way, rather than trying to do it before. Trust me again. I tried it both ways. First way involved some cuss words. :)


Red strip of fondant with thinner white strips.


Attach the stripes before you put the ruffle on the cake. Trust me on this too. I tried  to add them after the ruffle was applied, and it involved some cuss words. :)


Pinch and ruffle as you go along. Use paper towel scraps to prop up your ruffles or they will just droop down flat.


This green ruffle used the PME smocking roller. Don't even think about doing the impression after the ruffle is on the cake! :)


In place.


Another white ruffle with bigger red polka dots.


Diagonal white stripes on green ruffle.


Keep it on going all the way up the tree.


I finished mine with a bow on the top. Prop it up with paper towels until fully dry and firm.When everything is fully dry, take all the paper towels out. If you have dryness, cornstarch residue, or just want to refresh the look of the cake, we then do what?   I know you know! :)


Fondant clay gun squiggles and polka dots to dress up the board.


Cute, yes?

Let's see how the inside looks:


Fun, yes?


Kewl.


I love my little ruffly tree cake. I think the Tshirt would be proud.


What other color combinations do you think would be cute for this cake?


I hope you like it and try it!

Happy Caking!
Sharon

Tuesday, December 13, 2011

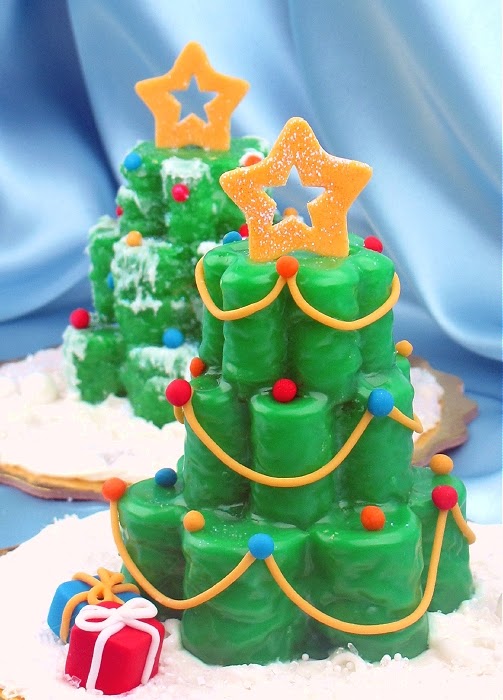
Christmas Tree Mini Cakes


Oh Christmas Tree!


Oh Christmas Tree!

I have a serious weakness for mini and individual confection cuteness.  I saw a mini cake on the Family Fun website that spurred the idea for these. Come along with me and I will show  you how to make 'em!

I used frozen pound cake in this case because I was too lazy too pressed for time to bake. You can certainly use your own recipe and cut these from sheet cakes. Just be sure to use a very sturdy cake or they will not hold up under the weight of the icing.


I used my Ateco nesting blossom cutters for these trees, but you could also use squares and stagger the shapes, or even hexagons might be cute. (Ignore the marshmallows in this photo. I ended up not using them but forget to retake this photo. Oopsie.)


Level the cake and create a layer the height you want each tier of your tree to be. My layers were right at one inch high each. Use your three sizes of cutters and cut out the shapes. 

This next thing I am going to tell you is very important, so lean closer to the monitor so you can hear me. Closer. Still a little closer. I do not want you to miss this, because  the success of your entire project may depend upon this!


Monday, December 5, 2011

Holiday Sale!


Time to celebrate the holidays 
with your choice between two offers!

You can choose either:

20% off your entire purchase**
**excludes two flower DVDs

OR

With every purchase of $50 before shipping, you may choose one of the following items as your gift:

Back to Basics DVD
Perfecting the Art of Buttercream DVD
Flawless Fondant DVD
Successful Stacking DVD
Boxes and Bows DVD
Topsy Turvy DVD
Sheet Cake Secrets DVD
Sheet Cake Bonus DVD
Design Gallery DVD
Sweet Luxuries DVD
Book Smarts DVD
Diamond Impression Mat
Line Impression Mat
Butterfly Stencil
Daisy and Dot Stencil
Frill Cutter set 1
Frill Cutter set 2
Palette Knife
Stitching Tool
Baby Bootie Cutters
Bench Scraper
Choose two of the molds below:
Chocolate Frame
Business Card
A-L Chocolate Mold
M-Z Chocolate Mold
Cherry Cordial


To choose 20% off your order:

Use coupon code holiday20 upon checkout.

OR

To claim your free item:

Please do not put the desired item into your shopping cart or you will be charged for it. Upon checkout, enter the name of the desired item into the order instructions/comments box, and proceed with checkout as usual.


OFFER GOOD FOR ORDERS PLACED
December 5-15, 2011 ONLY

** These two offers may not be used in the same order
** May not be combined with other special offers


Happy Holidays from SugarEd!

Sunday, November 20, 2011

Perfect Pumpkin Roll


Thanksgiving Blog Blitz Post #5

Welcome to the 5th and final installment of my Thanksgiving Blog Blitz. I gotta tell ya I am plum wore out. Been burning the candle at both ends over here, as I am sure many of you are too. I am just flat busted exhausted.  So  this post is going to be a little bare bones. I don't have any ideas for witty commentary or fancy photos. But I still want to give you the information for this project as promised:


How to make a perfect pumpkin roll:


Make the recipe and bake it.


Add some filling, roll it up, and it should look like this:


Enjoy! Hope you try it!

Happy Thanksgiving everybody! 


JUST KIDDING!


 You guys know I would never do that to you! 
I was just messin' with ya!  Tee hee hee.

Here we go:


How to make this most gorgeous and beautiful pumpkin roll:


Make the recipe as directed (given below). Line a 10x15 jelly roll pan with wax paper or parchment paper, spray with pan spray, pour in the batter and bake as directed. Do not over bake. Take it out as soon as the top springs back when touched.


While the cake is baking, take a clean kitchen towel that does not have a very loopy surface and  dust it liberally with powdered sugar.


As soon as the cake is done, flip it out onto the towel and peel off the wax paper. Do this right out of the oven. Do not cool it. Do not go get a sip of diet coke and then forget about it. (Just sayin'; that does not work.)


Immediately roll up the cake and towel together, then place on a cooling rack for about one hour. Now you can go get something to drink.


Once the cake is almost completely cool, but just barely warm, unroll it and spread an even thickness of the cream cheese filling across the cake. (Recipe below.)


Roll it up, somewhat tight. If the cake was not over baked or over cooled, it should not crack. If it cracks, do not freak out. No freaking out over pumpkin rolls allowed. You can cover it with powdered sugar or icing later.


Wrap this in plastic and keep in fridge at least a couple of hours  or until a short time before serving. It is easier to cut while cold. The slices come out cleaner and prettier, but you do not have to serve it cold.  (Please ignore the fact that there is more diet coke in my fridge than milk.)


Take it out the fridge and cut off the two rough ends of the roll, as the ends are not too pretty. Those are your quality control portions. You have to test it before serving it to others, of course!


Sprinkle with more sifted powdered sugar once on your serving platter. Is that not gorgeous?


Incredibly yummy too.


Please do not be afraid to try this. I was afraid the first time I did one that it would be a disaster. It is actually a very easy process, and  you should get perfect results each time. The recipe is quick  to do and tastes great. This is a perfect last minute holiday dessert that you can whip up in no time. And of course, you will impress everyone with this stunner.


Ingredients

CAKE:
  • 1/4 cup powdered sugar (to sprinkle on towel)
  • 3/4 cup all-purpose flour
  • 1/2 teaspoon baking powder
  • 1/2 teaspoon baking soda
  • 1/2 teaspoon ground cinnamon
  • 1/2 teaspoon ground cloves
  • 1/4 teaspoon salt
  • 3 large eggs
  • 1 cup granulated sugar
  • 2/3 cup LIBBY'S® 100% Pure Pumpkin
  • 1 cup walnuts, chopped (optional)
FILLING:
  • 1 pkg. (8 oz.) cream cheese, at room temperature
  • 1 cup powdered sugar, sifted
  • 6 tablespoons butter or margarine, softened
  • 1 teaspoon vanilla extract
  • Powdered sugar (optional for decoration)

Directions:

FOR CAKE:

PREHEAT oven to 375° F. Grease 15 x 10-inch jelly-roll pan; line with wax paper. Grease and flour paper. Sprinkle a thin, cotton kitchen towel with powdered sugar.

COMBINE flour, baking powder, baking soda, cinnamon, cloves and salt in small bowl. Beat eggs and granulated sugar in large mixer bowl until thick. Beat in pumpkin. Stir in flour mixture. Spread evenly into prepared pan. Sprinkle with nuts.

BAKE for 13 to 15 minutes or until top of cake springs back when touched. (If using a dark-colored pan, begin checking for doneness at 11 minutes.) Immediately loosen and turn cake onto prepared towel. Carefully peel off paper. Roll up cake and towel together, starting with narrow end. Cool on wire rack.

FOR FILLING:

BEAT cream cheese, 1 cup powdered sugar, butter and vanilla extract in small mixer bowl until smooth. Carefully unroll cake. Spread cream cheese mixture over cake. Reroll cake. Wrap in plastic wrap and refrigerate at least one hour. Sprinkle with powdered sugar before serving, if desired.

COOKING TIP:
Be sure to put enough powdered sugar on the towel when rolling up the cake so it will not stick.


And here is a video of the process that might help:


-----------------------------------------------------------


I hope you guys have enjoyed the Thanksgiving Blog Blitz, and have found something that you would like to try for your family, friends and customers. Let me know which ones you made and how they turned out.

I would also like to take this opportunity to tell you all how thankful I am to have the honor and privilege to interact with you here on my blog and in my DVDs. You all have brought so much to my life. It gives me great joy to get to know you all and share our love of baking. I thank you for your business and your friendship. I truly hope you have  a wonderful Thanksgiving holiday.

Happy baking,
Sharon
www.sugaredproductions.com


Friday, November 18, 2011

Turkey 3D Cookies


Thanksgiving Blog Blitz Post #4!


Gobble! Gobble!


How about some 3D turkey cookies?


As I have mentioned before, I have a weakness for cute little turkey confections. Here is another take on turkey cookies:


Bake your  favorite  cookie recipe and cut out large blossom shapes. After cooling, cut a portion off the bottom to make a flat  bottom edge. Outline your cookie with thickened icing and flood in your main color. I used glace icing here, but you can also use royal.


Immediately pipe in the above pattern with the other colors in flood consistency icing. It will sink right in. Then take a toothpick and drag it through that pattern, starting from the outer edge of the cookie, in toward the center.


Do this 3-5 times in each section of the blossom. You will create the feather pattern you see above. Let that fully dry, about 24 hours.


Use Nutter Butter cookies to make the turkey body. Take the cookies apart, scrape off the peanut butter, happily eat that, and then cut the  bottom portion of the cookie off. Happily eat that too. Dip the cookie in melted chocolate and let dry fully.


Use candy eyes, and royal icing to pipe the beak and red jiggly neck thingy. (Been getting a lot of use out of those candy eyes lately too. They rock.)


When you are ready to assemble, outline and flood a circle shaped cookie for the base. Let that set up for a few hours, but not until it is fully dried through. At this point you can put the feather cookie and body cookie on top of the base cookie. It will sink down a little bit into the still partially wet icing. When that fully dries, it will hold the whole cookie together. You might have to prop up the  back of the cookie with a little something while it is drying to  keep it perfectly upright.  Let that  base surface dry very well.


Use a clay gun to extrude a thick string of yellow fondant. Smash down  one  end with your finger and then cut out notches to make the feet.


Bend the feet up at the ankles and put them in place. I also used a very thin clay gun string in black to outline the base cookie to give it a little pop.


Turkey time!  How cute would these be on your Thanksgiving place setting? Or lined up on a dessert buffet.

I hope you try these. You will seriously impress your family and friends!


Sugar Cookie Recipe:

one cup sugar
one cup butter
one egg
1 tsp each vanilla and almond flavoring as desired
3 cups all purpose flour, sifted

Cream sugar and softened butter. Add egg and flavorings and beat for a minute or so. Add flour one cup at a time until just incorporated. Knead gently for a minute. Ready to roll out and use right away. Bake at 325.


Glace icing:

one pound powdered sugar
6 TBS light corn syrup
6TBS milk
clear flavorings as desired

Combine in bowl and mix well with a whisk. Adjust with more sugar or milk to create outline and flooding consistencies.


MAKE US PLEASE!


Happy Turkeys!
Sharon
www.sugaredproductions.com