HELLO SUGAR FRIENDS!!
I know it has been a long time. I apologize for my neglect of the blog. We have been so very busy behind the scenes, working on new and exciting projects for SugarEd that have been very time consuming. We are planning our next DVD releases, a website upgrade and expansion, and more fun surprises that you will learn more about at the end of this year. (Good things come to those who wait, LOL)
Things are starting to settle down just a bit, so I am going to do my best to get back to blogging regularly. And I thought you might enjoy a tutorial on the basket cake I made last week for an Easter order. I know Easter is over, but you can use these techniques for many types of other cake themes.
Disclaimer: There seems to be something amiss with my camera (or there is the very remote possibility it is user ignorance), so the quality of these photos is not great, but I think you can still see them pretty well. I so want to take photography classes but there is just no time!
Today we are going to make a big ole beautiful Easter basket full of pastel chocolate eggs!
 The basket handle was made about 5 days ahead of time. I used half chocolate and half white fondant, adding a very liberal amount of powdered tylose. I formed two thick sausages, then twisted them together, and curved them into the shape I needed for the handle. Make a wire handle that custom fits your cake in width and height, and use that as a guide to form the shape of your fondant handle. Insert sucker sticks into the two ends of the handle. I put it on a cooling rack so the air could get to the under side to aid drying. I have done this many times with success, but I think next time I might try 50/50 gumpaste. More on that later.
 Now to make the chocolate eggs. I like Merkens brand super white candy melts. I used candy colors to tint it a few pastel shades. I used a large 3D egg chocolate mold to form the eggs. The molds are clipped together with strong office clamps, and the chocolate is poured into a hole cut out on the underside of the mold. The mold was put in a small cup to hold it straight and put in the freezer for about 15 minutes. Then the mold was removed from the cup and placed back in the freezer, allowing the cold air to fully reach all sides of it. It was ready to be unmolded at about 20-25 minutes total freezing time.
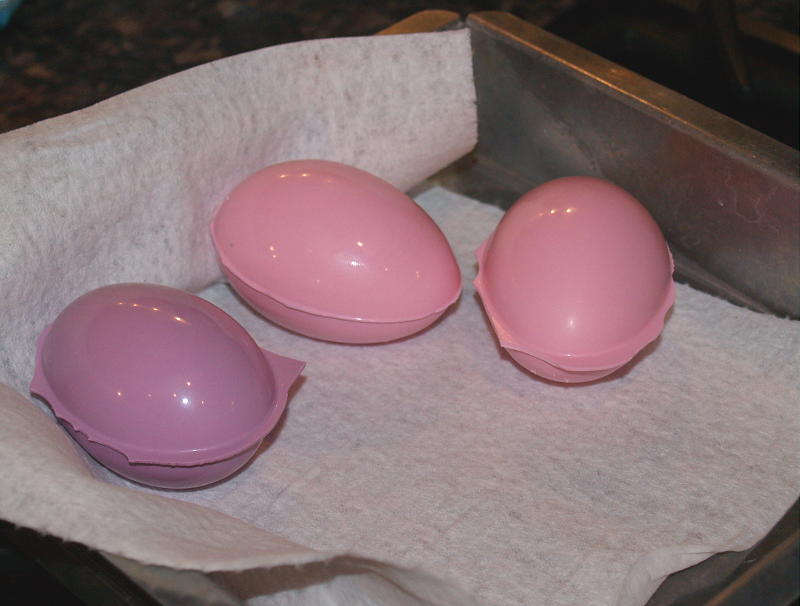 Here are some eggs fresh out of the molds. Oh no!! Look at those ugly seems! What shall we do?? No worries, we can clean that up easily.
 Here they are all cleaned up. Use your palette knife or exacto knife to scrape off all the excess. Then use the heat of your gloved hand to smooth and buff out any lines and imperfections. This will cause the egg to lose its shine from the mold, but I have never seen a super shiny dyed Easter egg anyway. We are going for realism here!
 However, we do want just a little bit of sheen to bring our eggs up a notch in elegance and refinement. So I used the edible lacquer spray an gave them 2 or 3 thin coats, allowing them to dry in between coats.
 Here are the eggs right after spraying. Once dry, they will not be nearly this shiny.
 Then the fun part of decorating the eggs! I used a variety of pastel colored fondant, strip, circle and flower cutters to decorate them in a variety of designs. You can use water, piping gel, or shortening as the glue for your fondant trims.
 Aren't they pretty? Try to get your fondant thin, as thick bulky appliques do not looks a nice on the eggs. Now back to the basket..... ( after a fountain Diet Coke run, of course.)
 Ahhhhh, now that we are all refreshed, it is time to carve the cake into a slightly tapered basket shape. I have three 2 inch layers of cake here with one layer of filling. The cakes are 12 inch diameter. If you need to see the detailed method for carving this shape, you can check out our Tosy Turvy DVD.
 Once the cake was carved, I used the thickened ganache method (also shown in the Topsy Turvy DVD) to coat our cake. Here it is shown all nice and smoothed. The top edge of excess ganache is removed the next day after the ganache has set up to a nice firm shell.
Now we have time to go play on Facebook, have some coffee and a snack, watch tonight's rerun of the Young and the Restless, and then go to bed. Tomorrow we put our basket all together!
*
*
*
*
*
*
*
*
*
Good morning! Did you have a nice rest? Oh, who am I kidding. I never cake in the morning. I never cake before 3PM. Not a morning person, it takes me half the day to get fully awake and functioning.

So now we must roll out a very long piece of fondant (half chocolate and half white for this shade of brown) that is long enough to wrap around our cake, with a little extra on the end.
 I used the PME basketweave roller to make the basketweave impression. I. love. this. roller. The end.
 Measure how tall you want your piece of fondant to be and cut a strip that exact height, and roll it up bandage style.
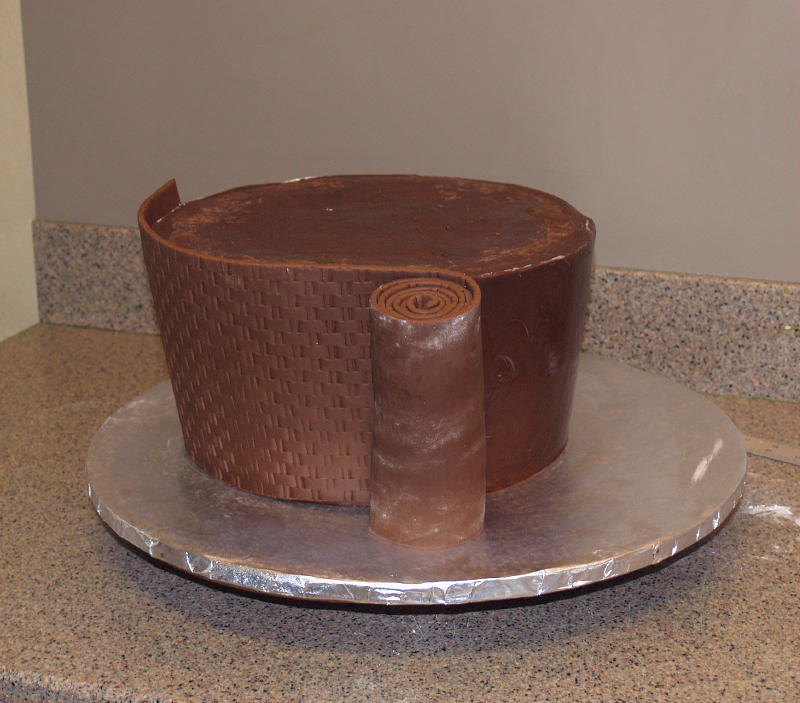 I smeared shortening all over the ganached cake (with a gloved hand) in a light coat for glue. Shortening is excellent glue. Then I started at the back of my cake, and unrolled the wrap as I went around the cake. (I was taking my own photos, so I had to step away from the cake to take the picture.)
 Do not pull or stretch it as you unroll. Just gently unroll it as you smooth it onto the cake with your hand. You do not want to erase or distort the basketweave pattern.
 I used a clay gun to make a rope border for both the top edge and the bottom of the basket. Here you can see two large bubble tea straws inserted into the cake where the sucker sticks at the base of the handle will go.
 I filled the straws with melted chocolate using a piping bag.
 Then the sucker sticks were inserted into the straws . I propped the handle in place with a roll of Viva until the chocolate set.
 I added more chocolate around the base of the handles to add more stability to them and let that fully firm up. Lookin' good!
 Now I have to insert four support straws.....
 .........that will hold up the cake circle that will support the weight of the heavy chocolate eggs.
 Looks like an Easter basket now! I just added pieces of rolled out ivory fondant in a free form blanket shape and placed the eggs on top. So pretty! But hmmm....... that handle does not look quite as straight as it did when I put it in. Oh well, I am sure it will be fine.
 I added a pink gumpaste ribbon and bow, and piped buttercream grass to complete my project. Boy, that handle is getting wonkier looking. I checked it; it seems solidly in place and stable. Well, it is time to go deliver. I am going to drive because hubby has been banned from driving with cakes after that last episode we will not speak of.
*
*
*
*
As I pull into the neighborhood of the client, I hear a big thump in the back of the vehicle. I knew what it was. I knew what had happened. I could not look. I said to Hubby, it happened didn't it? He said, Yep.
Ok, now what to do? Surprisingly , I did not freak out. I called the customer, explained to her what happened, and that I was going back home to to do repairs. Unfortunately I had only one handle (I always make two, always.... but not this time for some unkown reason). I explained to her that it will not have a handle, but it will be a pretty cake anyway. She was incredibly understanding and not upset in the least. Thank goodness for easy-going clients , right?
So back home we go. I should have taken a photo of it with the broken handle. It broke off clean on both sides, about 6 inches up from the blanket. There was no fixing it.
 Here you can see where I clipped the broken handle down as low as I could to the top of the cake without disturbing the other decorations. I dare not attempt to take the pieces out of the cake that were embedded. My plan was just to cover these spots with a little bit more blanket, that is until a lightbulb went off! I had an idea!
 I would make small side handles! I could do this over wire, and it would not require the handles to have any drying time before I applied them. I bent some floral wire into the desired shape, and simply wrapped a clay gun string around it.
 I coated the ends of the wire with chocolate, and after that was dry, I inserted the handles into both sides of the cake. I used melted chocolate to close in any holes or gaps where fresh cake was exposed, and also to secure the new handles in place.
I added some more blanket pieces to cover all the oopsies, and here is the final product:


What do you think?

I think I might even like it better than the first version. Whew, so glad that worked out, because who ever heard of an Easter basket with no handles?
So all is well that ends well! I hope you guys give this basket technique a try. I would suggest using a lot of tylose or gumpaste in your handle, and give it at least a week to dry if not longer. Or possibly even form it over very sturdy wire that can provide some support. I have made large handles using this method many times with success; I think this time it had not dried long/hard enough.
Oh and make TWO of everything!
Happy Caking Everyone!
Sharon
http://www.sugaredproductions.com/