Hi Sugar Babies!
Sorry for the delay in posting. I have been working hard on the editing of the new DVD so we can release it ASAP. Plus my a/c went out for a few days, and that threw my whole schedule behind. Ain't it always sumthin'?
 So a few months back a lovely bride brings me this magazine cover for her wedding cake. She wanted it exactly the same, except for the appliques not to be snowflakes since she was having a spring wedding. The magazine did not give credit to the artist, so at the time I did not know it was the amazing Liz Finch of Britain. I have since found that out, and contacted her to thank for such a gorgeous design, and to let her know I copied it. She was very lovely and sharing.
 I hoped that my version would do her incredible art justice. I was pleased with my rendition in the end, and the bride was happy with it too.
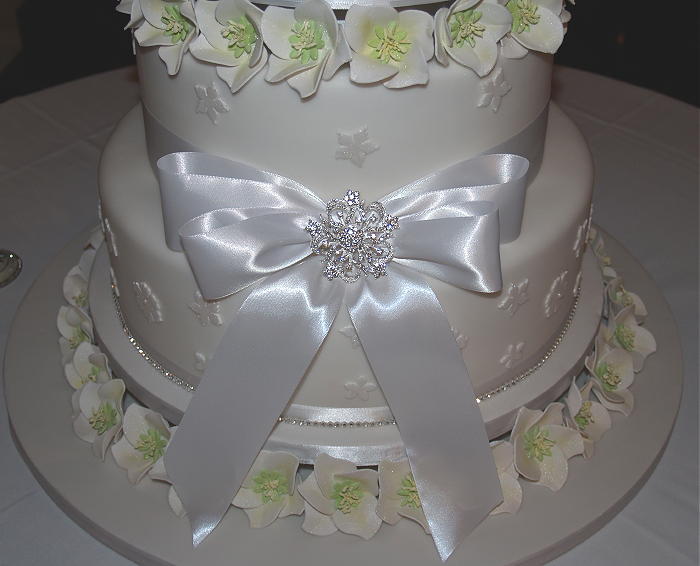 The bow was satin, and the brooch was costume jewelry purchased by the bride. At the time that I made the cake, I had no idea what those flowers were, so I just tried to copy them as closely as I could with the materials I had available to me. Liz has since told me that they are Christmas roses, and there is a cutter set available for them. Good to know for next time!
 So I just winged it based off the magazine photo. I started with two types of stamens I purchased online here and here.
 This photo is washed out, so you can't really tell that the tips of the stamens are yellow. I gathered up a few of each type, and used white floral tape to assemble them around a short floral wire.
 Then I used this small eight petal blossom cutter to cut the shapes from green gumpaste.
 I pinched the ends of the petals to elongate them just slightly, and then pushed the slightly dampened stamen wire down thru the center of it.
 I then let them dry upside down until they were fully dry. (Yeah, that is a cooling rack on a Viva paper towel roll... I am just so high tech! LOL)
 Next I cut out little discs of white gumpaste, to provide a base to glue the flower petals onto. Liz has told me that her flower petals were individually wired, but this worked in a pinch!
 I let the discs firm up a good bit, and then slipped them up the wire. Notice that I left a space between the green blossom and the white disc. We need that space to place our petals. The white discs did not want to stay in place , so I cheated and put a dab of hot glue under each to keep it from sliding around.
 Then it was time to cute the petals. I used this rose set, the same one I used to make the purple flowers on my TLC cake. It was the closet shaped cutter I had to what I saw in the magazine photo. I rolled the gumpaste to number 5 on the pasta roller, and very barely softened the edges with a very light touch with the ball tool. The petals looked to me to be on the thicker side, than say regular roses, so I purposefully left them that way.
 I placed some foil over a cup, and stuck the stamen down into it.
Then I dampened the white disc and applied the petals around it.
 Overlap each one as you place it, for a total of five.
  I pinched the petals to give them movement, and lifted and turned them slightly to make them look more realistic. I propped the petals up with cotton to achieve the shape that I wanted.
 Drying.....
 After they were fully dry, I dusted the insides of the flowers, down at the base of the stamens, with some yellow and kiwi green. Then I gave the whole flower a dusting with super pearl luster dust. The dusting really makes gumpaste flowers come to life. When I assembled the cake, I put them in place and glued them down with just a small dab of melted white chocolate.
 A little bling added to the topper. I also dusted the fondant appliques with super pearl. I brought the cake in 2 sections and finished the assembly at the venue. It was really quite striking and beautiful in person.
I was very excited to be able to do such a beautiful design, and something different. It was very ironic to later found out that I had made Christmas rose for a spring wedding cake!
_______________________________________________
Don't forget to order your copy of our new DVD:
Back to Basics
Baking for Cake Decorating
-----------------------------------------------------------
And check out the Confection Collection.
New items are added weekly!
Free shipping code: SugarEd
------------------------------------------------------------
Happy baking everyone!
Sharon


13 comments:
Sharon, congratulations and thanks to show us all the tips you used for this beautiful and elegant cake
Sharon you rendention of the christmas roses where on point. The cake was absolutely magnificant. Thanks for sharing
Beautiful cake ..thanks for sharing!!
beautiful!
Wow, so pretty! You did this cake design proud.
Really gorgeous cake Sharon.
Gorgeous...simply gorgeous!
The cake is beautiful and the flowers were perfect! Thank you for sharing how you made them.
Wow, Sharon, truly amazing!!!! I hope that you do a DVD on sugarpaste flowers, you'd be great!! What a fantastic cake, I am sure the bride was extremely happy!!
You did Liz's design justice, it's a beautiful cake, great job!!!
Sharon beautiful cake! Thanks for sharing on how to make those elegant flowers. :D
This is stunning!! You served the design inspiration perfectly :)
I've gotten 2 of your DVD's and they are AMAZING!! You are great at what you do and an even better teacher!! Thank you, I'll be ordering the rest soon!!!
Post a Comment